
Create Professional Custom Embroidered Patches Easily with the Patch Pro Kit
Embroidered patches never go out of style. They are a staple for sports teams, businesses, clubs, scouts, cheer squads, and collectors looking to add personality to jackets, hats, bags, and uniforms.
Offering custom patches opens a high-demand, profitable niche for embroidery businesses, offering strong margins and endless customization potential.
ColDesi's Patch Pro Kit makes it simple to produce professional-quality patches on demand using your existing embroidery machine—no large runs or inventory risks required. This complete bundle empowers you to deliver custom, durable patches that customers love while growing your business.
🚀 Why Embroidered Patches Are Always In Style
Reproductions of vintage patch designs continue to attract collectors. In the commercial embroidery business, if you are not offering patches, you are missing out on a tremendous growth market with no signs of slowing down.
Traditionally, retailers had to guess which pre-made patches to stock. This guesswork eats up profits—stocking too much of a slow seller and not enough of what customers actually want.
The solution? On-demand production.
Make Patches Today With the Patch-Kit Pro
With Colman and Company’s Embroidery Patch-Kit Pro, your business has everything it needs for easy one-offs or small production runs. The kit is centered on the DK-JP14 Heat Press with a 12" x 14" platen, end-of-cycle alarm, and an industrial-type clamping system.
📦 What's Inside the Patch-Kit Pro?
- ✅ DK-JP14 Heat Press (Industrial Grade)
- ✅ Hot Knife and Universal Cutting Tip
- ✅ Hot Tool Holder (Safety Stand)
- ✅ 5 Yards Each of White & Black Patch Material
- ✅ 10 Yards of Heat Seal
How to Create Custom Patches: A Step-by-Step Guide
Using the Colman Patch-Kit Pro is easy. Just follow this workflow:
1️⃣ Create Your Design
There are three golden rules when digitizing for custom patches:
- The Border: The patch must have a satin running stitch as a border; wider is better than thin.
- The Shape: Keep the border smooth to allow for easier cutting later.
- The Thread: You must use Polyester embroidery thread (like Madeira Polyneon).
Pro Tip: Colman Patch Material acts as your background color—no fill stitches needed! It comes in 10 different colors to match any team or brand.
2️⃣ Hoop the Patch Material
With Colman Patch Material, there is no need for a stabilizer, backing, or topping.
Because there is no adhesive on the back to gum up your bobbin case, you simply need to ensure you hoop the fabric straight. This material is unique and completely different from HTV vinyl.
3️⃣ Sew Out the Design
Stitch out your design. It is always wise to stitch a few extra "buffer" patches just in case of mistakes during the cutting process.
4️⃣ The Heat Seal "Sandwich" Method
Once your patches are sewn, keep them together (don't cut them out yet!). Now, apply the Heat Seal backing:
- Place a Teflon Wrap flat down to protect the Heat Press.
- Place the Patch Material face down on the press.
- Place Heat Seal materials on top of the sewn patches (face down, paper side up).
- Place another Teflon Sheet on top to create a "sandwich."
- PRESS: 320-330° F for 10-15 seconds at 40 psi.
- Flip the sandwich over and press again.
5️⃣ Cut and Seal
Roughly cut out the patches, leaving ¼ to ½” of material surrounding the satin stitch border.
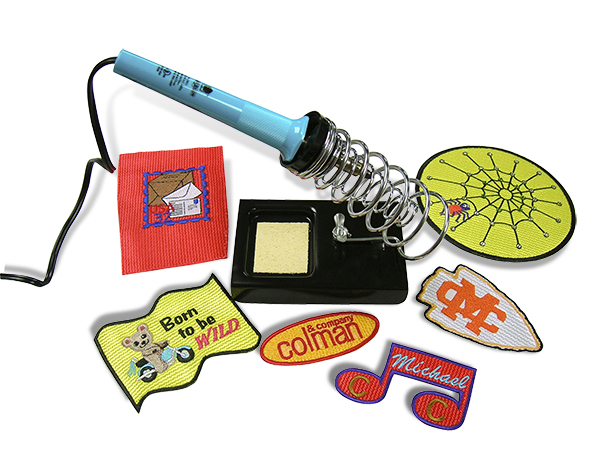
⚠️ Safety First: Heat your Hot Knife for 15 minutes before use. Always use the Hot Tool Stand to prevent burns or fire hazards.
Place the patch on a glass surface. Run the Hot Knife's Universal Tip directly along the edge of the satin stitch. This cuts the fabric and seals the edge simultaneously to prevent fraying.
The Result: Permanent, Professional Bling
You now have a completed patch ready for application! To attach it to a garment, heat press at 320-330° F for 15-20 seconds (pressing from both front and back). This activates the glue, creating a bond so strong the fabric will likely rip before the patch comes off.
Ready to profit from patches? Contact the embroidery experts at ColmanAndCompany.com or call 800-891-1094 today.

